Showing posts with label DIY. Show all posts

Saturday, February 28, 2015

Springtime Shelf & Coffee Table Makeover

Good morning all!  Yes I have been absent for a little while, and I am sorry about that; unfortunately with working full-time, school full-time, and add in the husband and three child family - you could say it's chaos. 
I have been working on little projects here and there. And I have definitely been building up the project inventory. I also have an amazing client project to get started on as well!

Today I have a two projects for you and a sneak peek of my current inventory. 

Sometimes to brighten up a room, all you really need is a fun and funky accent piece. That accent piece can come from something that normally would have blended in as well. 
When I found this little dandy, that's exactly what I had in mind. 


This shelf is approx five inches deep, and 26" x 25"; so it's definitely a decent size.  

I didn't take very many step by step pictures on this because it was a very easy project. 
Just some paint, a small stencil - then waxing and distressing. 
The finished product turned out very cute though. 


This is a super cute shelf that can be used to brighten up any area of your home. 


Now the other project. 
This gem was found at our local Habitat For Humanity ReStore. This is a solid oak Lane coffee table. Even though it's outdated, I knew there was something beautiful hiding underneath the outdated stain color. The short column legs I saw and instantly fell in love with them. 

There was quite a bit of water damage on the top and the previous poly coat was peeling. 

Lots and lots of sanding. Starting out with 80 grit, all the way up to 220 grit. 

After seeing the beautiful woodgrain I decided for certain that the top would be stained rather than painted. 

But the sanding doesn't stop there!

All the sides were pretty heavily coated in old poly so I wanted to start fresh. 


I stained the top with my favorite one "Espresso". I really love this color
The bottom is Annie Sloan Chalk Paint in Pure White.  Then distressed to highlight the beautiful feature and curves. 

The top has three coats of poly in a satin finish for protection. The rest of the table is sealed with clear wax.

I love how it turned out so much, that I decided to keep it for myself. It helped to lighten up our living room and fits in wonderfully!


Now onto the upcoming projects. There is so much coming up, and I just can't wait to get started. I found some real beauties (mostly in part to some great friends who are always on the lookout)!

Alright so yes I started working on this already and yes it doesn't look very pretty right now. There were many more divots/nail holes in it than I originally noticed so had to fix that. Not everything starts out looking pretty. 


This is just such an odd shaped table and the door that you see goes thru to the other side. I also found this at the local Habitat for Humanity ReStore. 


This is actually a set of two. I already took out the drawer pull and found more holes from previous drawer pulls so that is what you are seeing. But look at those legs - love the heavy texture. 


This is also a set of two. While they are more "boxy" that my normal pieces, they are rock solid and I think they could look just amazing. Possibly a fabric backing and some nice texture on the cube drawer from. 


Sometimes it's not just furniture that I find. I love this rooster bakery rack, and originally it was going to go into my kitchen - however I have since changed my kitchen away from roosters. Then there's these old '70s candle/wall sconces. I found these at a rummage sale and since then I've seen them at Goodwill, ReStore and everywhere else possible. I just feel like I can make them look more modern and amazing. 


Finally is this beautiful antique dumbwaiter piecrust table. I am so very excited about this one! It is bigger than the picture makes it appear. I did some research as well about it after I purchased it and wow, I didn't realize how much story was behind it. 


I do have a few more pieces and as I stated before, I have an AMAZING client piece that I can't wait to get started on. This client, Ryan, has directed me to many wonderful pieces and I can't wait to work on the hall tree/stand/mirror beautiful piece she brought in. I won't be previewing pictures of her piece until I'm further along. I hope to really get a good start on it next weekend when I'm home. 

If anyone is interested in the pieces shown, please contact me, as they haven't been started and rather than me picking out the colors and details - you could pick them to match your decor! 

Well I am away visiting my parents this weekend so no time for projects - but next weekend I'll be back in full force.  

Happy Crafting!

Sarah
Second Chances Design

Saturday, January 10, 2015

A little more info, and re-charging a dresser!

Good morning everyone! Hope you are all staying warm. We have been hit by some pretty frigid air this last week and today is no different - it's a balmy -5 degrees outside right now. This is perfect weather for inside projects!

A reader sent me a message stating that they would like a little bit of background information about me, and as to why I have so many projects going on in my home.

Where to begin...My name is Sarah. I am a wife, mother, daughter, sister, aunt, and friend. I was recently married to my wonderful husband in August 2013. We have three wonderful children in our blended family. Chloe is 12, Maddox is 10, and Joaquin is 6. In late November 2013, we bought our first home. We spent months looking for a home as we wanted one with enough space for our children and also for entertaining our large families. Our home is quite eccentric, and I am proud to say it has a wonderful history. It was built in 1947 and we are only the third owners. While our home was very well maintained throughout the years, it was never updated. When our realtor showed us the home, we noticed it had excellent "bones", but was in dire need of updating. We signed the papers the day before Thanksgiving and have been working on projects ever since! Some have been minor projects, others have taken months to complete. We take pride in doing things ourselves, and also try to do them economically. My husband and I both work full-time and are enrolled in school full-time as well. Thankfully we enjoy home projects, and it is what we do in the small amount of spare time we have. We will both graduate with our degrees later this year, so it will free up more time to work on the house.


Now onto the project of the post! 


Shortly after we moved, one of my closest friends also moved. Luckily for me, she needed to downsize and get rid of some extra furniture. I was more than willing to help her with her problem! One of the items she gave me was a dresser.
I should have taken a better picture of the dresser "before"; I apologize for the bad (and lack of) pictures now. I was just so excited to get going on it.  

The top drawer of the dresser actually has three "panels", while the other two were only one large flat panel. 

Just plain white, and a little boring for my taste. 
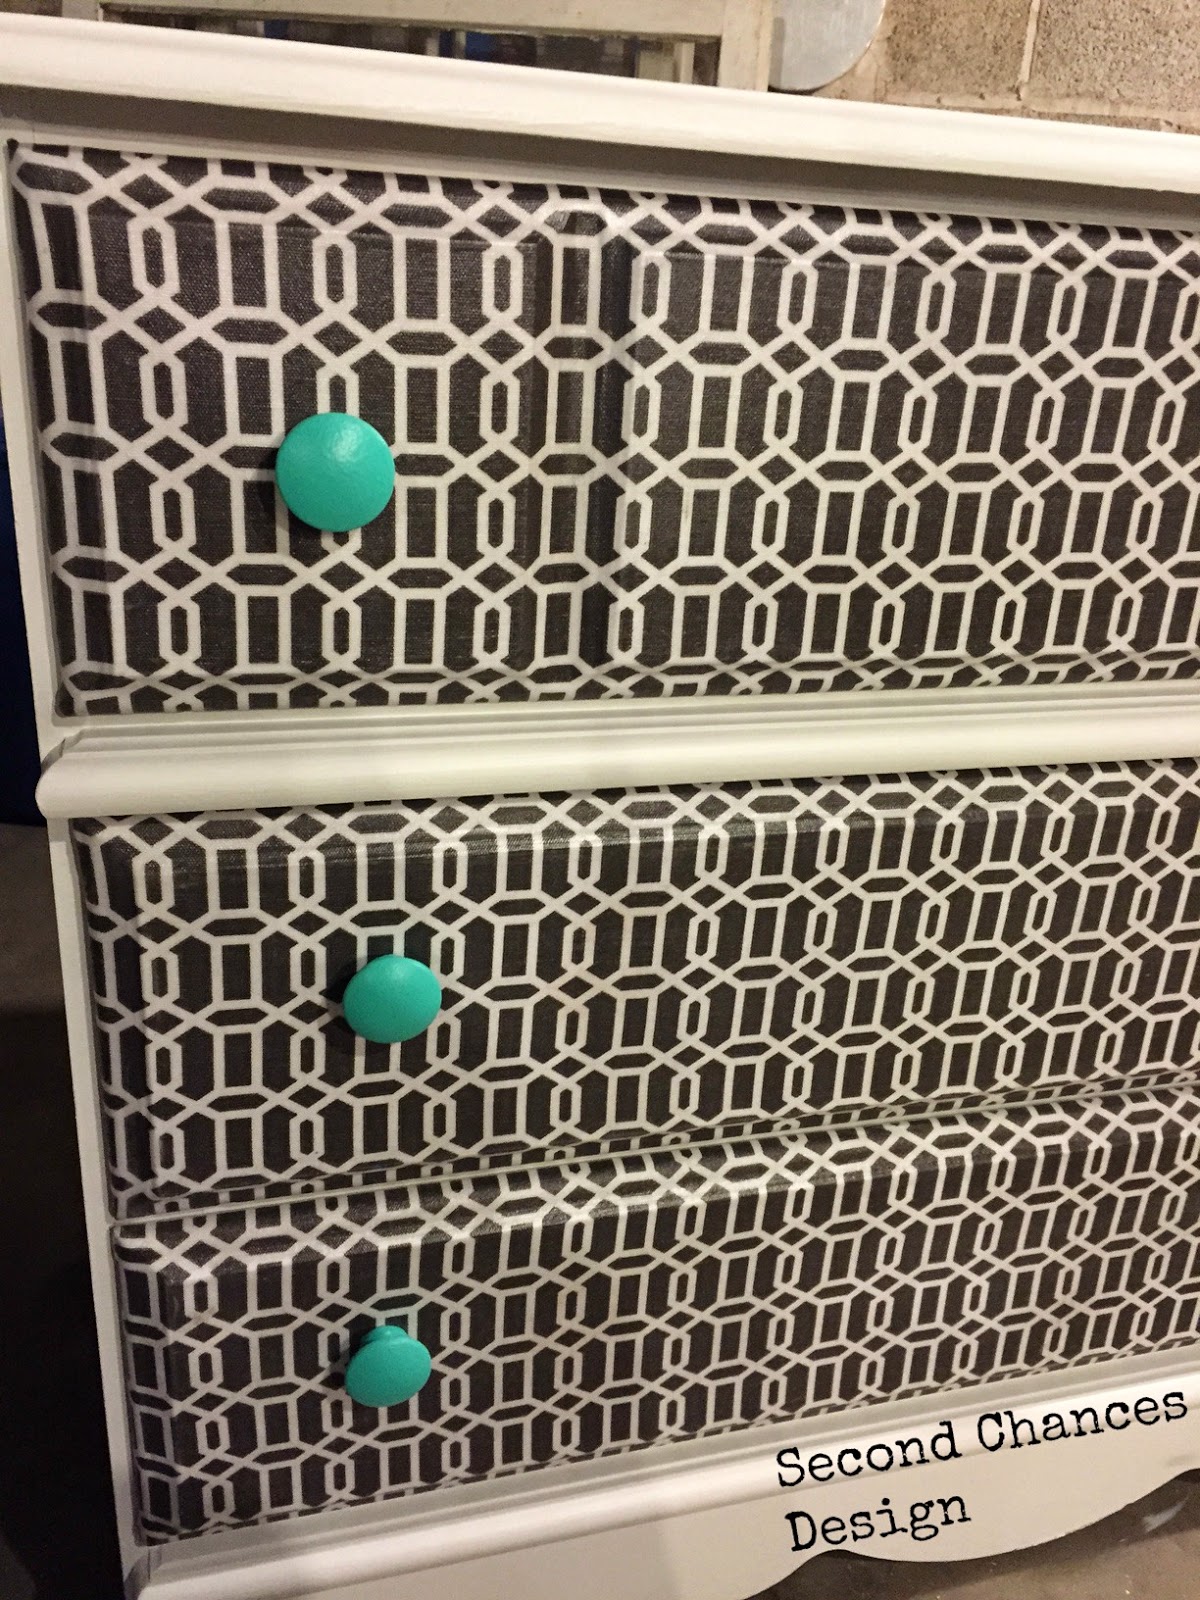
I wanted to cover it with fabric, but have a finish or seal of some type, so that it was durable enough for the 12 yr old Chloe. 
I only wanted one knob on each side. I used wood filler on the extra hole.
A little light sanding and we were ready to get started.

I found some wonderful fabric at JoAnn's that is heavier duty, almost light canvas.

I also picked up some Matte finish Modge Podge. This is my very FIRST bottle of Modge Podge (MP). Yes, it may be hard to believe, but I have never used Modge Podge before this project. I was very excited to say the least. I read several tutorials about using fabric and MP to cover furniture. I combined them to come up with my own method.  

It was very hard to take pictures during the entire process as I didn't wear gloves and my hands were covered in MP. 
I cut the fabric about 3-4 inches larger than I needed, as I knew I would trim it down.

I first put a medium-thick layer of MP down on the drawer front. (I would recommend either a foam brush or at least one better than shown in the above pic. I was loosing bristles like crazy and was constantly picking them out of the MP.)

After applying the MP, I then laid the fabric down. Since my fabric had a pattern, I had to be very careful that it was as straight as possible. Luckily since I had an almost thick layer of MP, I was able to manipulate the fabric and adjust it as needed. I did pull it up to reposition it a few times, but I think I got it pretty straight. 


I then used my hands and a spackle spatula to flatten the fabric and push out all the air bubbles. Be careful when doing this - when fabric gets any kind of moisture it can distort the pattern if you push/pull too much.I then applied a layer of MP on top of the fabric as well, working the MP through the entire fabric.

The MP only takes about 10-20 minutes to set up and begin drying. I did one drawer at a time, so by the time I was done with one step on all three - I could go back to the first one. After covering the top surface, I then trimmed the excess fabric. I held it tight around the edges and then left about 3/4" that will only be seen on the interior of the drawer. I applied MP to the ends of the drawer fronts, repeating the same process from before. MP layer underneath and on top as well.  For the corners, I tried to wrap it like present.  and they turned out pretty well. My ends did get a little "muddy" from too much MP, so next time I will try to either wipe the excess with a rag or just not apply too much in the first place. 
After all of the MP has dried, you can take a 220/320 grit sand paper and lightly sand the make smooth. Do not do this too much or you could actually start to damage the fabric. Follow this with a fine grade steel wool to lightly buff. I used a 0000 grade. For a final seal, I used a polyacrylic clear satin. Purchased at Wal-Mart for $3.97.  A small amount goes a long way. After applying two coats I still have more than 3/4 of the little container left. I applied this using a small foam brush. Once completely dry, I used a 320 grit sandpaper for a very light sanding to make sure 
I used the same knobs that were on the dresser, but I repainted them with the same Sherwin-Williams "Synergy" that the room is painted - now it ties together.

I should mention that I did clean up the dresser itself with a fresh clean coat of white paint. I wanted to make sure that it was all uniform and was a complete fresh start. 

For a first time MP project, I think this turned out alright. There are a few tips and tricks I will use next time, but I still LOVE how it turned out.
I do have to thank my hubby for the idea of painting the knobs "Synergy" - he's turning into my consultant. I love the POP of color!

This dresser will be going into my daughter's room, which will hopefully be complete sooner than later.  The flooring is done now, and the trim was put in last night. A few paint touch ups to the trim and DONE! We are picking up her new bed today, and will hopefully find new bedding as well - later today when we go shopping. 
Earlier this week I picked up two small end tables with beautiful wooden spindle legs. Plus I already had two other larger end tables. Today, we will be shopping and making a few stops to look for furniture and decor items. I'm always on the lookout! 
I'm also very excited to hopefully be stoping at a stockist for Annie Sloan chalk paint. (Annie Sloan does not retail at your average paint or home improvement store. They call their locations "stockists".) This is something else that is new to me, and I'm thinking about trying it out. I have been researching Annie Sloan chalk paint, sealing with soft wax, antiquing using dark wax, etc. We will see what things that brings our way!
For future posts, I will try to take more pics, document brands, be a little more detailed. It's all a work in progress!

Thanks for taking the time to read this (very lengthy) blog post and I hope that it inspires you to create your own projects at home!

Happy Crafting!

Second Chances Design
Sarah

Sunday, January 4, 2015

Herringbone / Chevron Wall ...a busy Sunday

To give you just a teaser of what will be to come, here is the play by play of my most recent paint undertaking.  We have been in the process of remodeling a bedroom for my daughter.  She is 12 years old, so of course she did not want a "little kid" room, and wanted something more mature.  I wanted something that would be able to grow with her, and I think we came up with something that will last a few years. 


I knew that we wanted a chevron or herringbone type pattern.  So after many hours of Pinterest, I decided on a herringbone pattern.  My hubby helped me on this one, since he's the engineer. We had to take measurements galore - we discovered that our house is like the leaning tower of piza, very crooked.  Our house was built in 1947 so I'm just happy that it's still very sound and sturdy, even if it is a little crooked.  I made a judgement call and decided to take the floor/wall seam as my base.

Here is the room - BEFORE:
Very plain and blah. 

So like I said I used the floor/wall as my base.  I measured, then put a line directly in the middle.  Then from there, I divided each half into another half, thus splitting the wall into quarters.  I then placed marks every 5 inches on my tape.  Then came the angle lines...boy, this was a little more difficult than anticipated.  Since there is an angled ceiling, we had to "freehand" our lines, but since we are so good at math, we discovered that our paint tape must be 4" apart of each other at all points in the angle.  (We used 1" wide paint tape.)  

This is what the finished taping looked like:

This took the majority of the time....tape, tape, tape and MORE tape.  

But now the hard part was over, now it was just time to paint! I used a small 4" wide paint roller, which was almost a little bit too big, but it was what I had to work with. I used a brush on the tight corners since the roller would not fit.  


In order to make it a herringbone instead of a chevron I needed to alternate the colors in each quarter. 


I applied two coats of paint of each color.  
These colors are Sherwin-Williams - Synergy and Morning Fog.  I am an avid Sherwin-Williams fan and will swear by their paint anyday! Even though it is a little pricier - you get what you pay for - it covers very well, and is quite durable. 

And now for the finished product after the tape was pulled!!

I think that it turned out wonderfully! Better than expected!  I am always leery about paint lines, but this paint tape was up to the task!  I used Frog Tape brand tape and that is all I use.  This wall has a light skip trowel texture to it, so I made sure to press the tape down hard to ensure full contact.  We only had a few small mishaps and I cleaned those up with a small brush.  

Hope that you enjoyed this adventure as much as I did.  This was completed in one Sunday, with the tape being pulled on Monday after work.  It took the ENTIRE day, but I think it was well worth the meticulous taping and painting!

Have a wonderful week!  There will be more to come on the progress of this bedroom - including a dresser reinvention with some modge podge...a first time experience for me!

Happy Crafting!
Second Chances Design
Sarah